Swap-bot Time: November 25, 2024 7:53 pm
www.swap-bot.com

Multi-color Bleached Zentangles Technique

Launch gallery slideshow
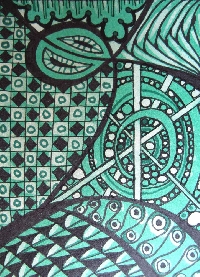
Multi-color Bleached Zentangles Technique
Group:Zentangle
Swap Coordinator:dobie256 (contact)
Swap categories: Art 
Number of people in swap:5
Location:International
Type:Type 3: Package or craft
Last day to signup/drop:December 23, 2011
Date items must be sent by:January 13, 2012
Number of swap partners:2
Description:

This is a new twist to a swap I hosted several months ago. Several people have shown interest in trying this process again. So here we go!

Previous swap with detailed directions

For this swap you do not need to leave it monochromatic (unless that is your preference). Feel free to bleach your cardstock and then add one or more colors back to the card. If you have favorite color combinations (say teal and purple, or pink and brown, etc.) here is a chance to experiment.

Specifics:

You will make one ATC for each of two partners (2 ATCs total)

Remember to test your cardstock BEFORE you do all of your zentangle work. Some cardstocks do not bleach well.

Mount your finished zentangle ATC on an appropriate weight background.

Rating of 4.9+, no 1s or 3s in the last six months (and then with explanation)

Please be sure to rate your partner.

And please, no flaking!

Discussion

Bucket 11/30/2011 #

Sounds like a great swap and I'm planning to join closer to the deadline. Thanks so much for hosting!

dobie256 12/ 3/2011 #

Glad you can join in. It is an addictive technique -- it is amazing the change in colors of some papers when you bleach them (and then sometimes color them again).

Bucket 12/20/2011 #

Here are the instructions from the previous swap, just to make things easier to see here:

I have been playing with a new technique of combining zentangles with a paper bleaching process. I am happy with the results and want to share it with the group. Hope you have as much fun with it as I have been having!

I am calling them Tri Color Zentangles because three colors are used. There are endless possibilities of adding more colors, adding seasonal designs, etc. which I will explore in future swaps. But for now, this will be a traditional style of zentangle with a new coloring process.

You can see examples on my Flickr page:

You will need: CHEAP colored cardstock. The kind you find at hobby stores at low prices. No texture. I find "The Paper Company" and "Reflections" papers work beautifully.

A colored pen -- the same color as your paper -- a sharpie, a gel pen, a Bic marker, etc. I used Sharpies on all of my examples.

Cheap old-fashioned 100% laundry bleach (not the fancy concentrated stuff).

Black markers. I use Micron pens which are fairly bleed resistent.

You can apply the bleach with a fine paintbrush or a blender pen. I have been using "Fantastix" which are inexpensive "disposable" blender pens found at JoAnns, Michaels, etc. They come six to a package and are usually in the stamping supplies. I can use them for many projects before the tip gets eaten up by bleach or flattened too much for detail work.

PLEASE NOTE: Test both your pens and your bleach on a piece of scrap paper! Some papers don't bleach well. Some pens bleed when the bleach hits them. Please test BEFORE you do all of your zentangle work!

When you are picking your zentangle patterns, try to pick ones that will lend themselves to coloring. You will have light bleached parts, parts where the paper is the color, and parts where you will have dark penwork.

When you are done with you black zentangle, carefully apply your bleach. Full strength. (Do this over newspaper, a craft mat, waxed paper, etc. in case of bleed-through). I lightly dab the blender pen tip against the paper. If you rub and scrub too much you will smear your penwork (even Micron pens). It sometimes takes a minute or two for the full effects of the bleach to appear -- be patient. Once the bleach has dried, go in and do your colored penwork.

dobie256 12/22/2011 #

Thanks @Bucket

Yea! Glad to see so many people joining in. I hope you all have fun with this technique.

Leave a Comment

You must be logged in to leave a comment. Click here to log in.

I received the item
I sent the item

Received from:
For multiple members, separate names with spaces

Description: